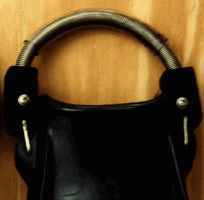
By David Dalton, Sr. & David Dalton, Jr.
You've heard about the incredible "Oceanic Spring Heel Straps" (OSHS) for your jet fins. You have played investigator and tried every source you ever knew to try to unearth a pair. You've attended scuba flea markets, run WTB adds, E-mailed Oceanic (don't bother they don't respond - at least on this subject) all to no avail. But you are determined! After all, they look so cool and you wouldn't want George to think you were a "Stroke" would you? So what are you to do. Why don't you just make a pair, you know good old American ingenuity! For about $20 and an hour or so of your time you can have a pair! You will be the envy of the "Tech Diving Community", your muscles will ripple, your teeth will glow in the dark, women swoon, the President will ask you to address the Compendium of International Divers. Well, maybe not, but at least you WILL have a killer set of fin straps that you'll cherish for all the days of your diving.

If you are not familiar with the OSHS, you can learn about them at Jon Breazile's "In Depth On Line Technical Diving Guide" which can be found at http://www.fifthd.com/gear/. Under "Fins" Jon gives a complete description of the OSHS with pictures and explains how to install them on your fins.
He also started a section about how to make your own, which started me on my quest to make a set since my efforts to find the "real deal" had been unsuccessful (see above).
The first thing you need is the spring itself, which for reasons that should be obvious needs to be made out of stainless steel (SS). If you have a spring company in your city you might get the springs from them. Otherwise I would use the source that Jon suggested, McMaster-Carr, an industrial supplier who has a presence on the internet (http://www.mcmaster.com/). What you want is their part number 9665K29 : Type 302 SS Continuous Length Extension Spring 1/2" OD, .054" Wire Dia, 20" Lg, 18.5 Coils/Inch. It is located on page 2969 and currently sells for $8.05 each. You will only need one spring for a pair of straps. Since it is 20" long just cut in half with a pair of linemen's pliers or wire cutters and use half for each fin. This will handle a foot up to 13 EEEE (my son). Shaq (size 23) on the other hand, may need two of them.
--------------------------------
Addendum 3/29/00:
Since writing the article and using these for 2 years and finding a pair of the originals I have the following suggestions:
The correct spring to match the original is McMaster-Carr part # 3932K24, Extra-Long Type 302 SS Extension Spring 1/2" OD, .062 Wire Dia., 11" Lg W/Machine Loop Ends @ $14.27 for a Pack of 3. (www.mcmaster.com <http://www.mcmaster.com> ).
The .053 that I used initially was OK (but not optimum) for wetsuit boots but was too weak to use for drysuit boots. The .073 was much too strong. The originals miked out to right at .062" (give or take a bit).
The absolutely easiest way to attach them is cut off the metal hardware from your jetfin and get a brass or stainless steel D-ring at Home Depot and hook the ends of the springs on the D-ring after spreading them apart then clamp them back together into the holes in your fins where the hardware was. Of course this doesn't look as pretty as the original or my version, but it is quick, easy, cheap and it works.
Be sure to run a piece of nylon cave line through the center of the spring to limit the stretch of the spring. I damaged one of the ...053" because I didn't do that. The original pair I found had one damaged spring as well even though it had the cord inside. The cord should be just long enough to allow you to stretch the spring over your heel.
I intend to re-write the article with lessons learned shortly and will advise. If you have any questions after reading the article e-mail me and I will be happy to respond.
Dave Dalton
-------------------------------
Next you need something to keep the spring from abrading your wet/dry suit boot. Go to Home Depot, Lowe's, Builder's Square or a similar hardware store and pick up some vinyl tubing that is 1/2 " ID (inside diameter). You will only need about 12" of the tubing but I had to buy it in a ten foot roll. Big deal, it only cost $2.95 for the roll. Cut a piece about 6-8" long, just enough to pad the area where the fin strap will press on your heel. Slide it over the spring, centering it on the length of the spring.
If you just HAVE to go diving RIGHT NOW and can't wait any longer to DIR, just tie it to the existing fin hardware with some nylon line (1/16 - 1/8" works fine) and you have the "Quick and Dirty" version. My son and I dove ours this way for about two months (30 dives) while I figured out how I wanted to permanently attach them. It works fine, but you need to watch the nylon line because it will fray and also it looks a bit "Rube Goldberg" (didn't hear any girls swooning).
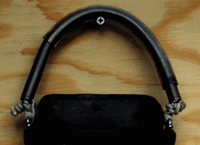
For a permanent attachment I decided to use rubber for the attachment blocks. I figured if I made them out of rubber, they would last as long as the fins. As a source for the rubber I used standard hockey pucks. They are cheap ($.99 each - you will need two for one set of straps) and you can get them anywhere. I got mine at a Sports Authority, but I just saw them last night at Walmart's. Off season Walmart might not have them but any sporting goods store should be able to help you out.
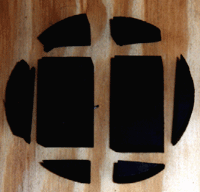
Cut each hockey puck in half and then trim off the rounded edges to leave two pieces (per puck - 4 total) that measure 1" X 1" X 2". I used a power miter box saw, but you could do this with a hack saw or other hand saw. I had a plain steel blade (non-tungsten type) which was sitting around collecting dust and it worked perfectly. The pucks cut like butter with a warm knife.
Now you want to drill a 1/2" diameter whole lengthwise in each piece of rubber about of the length. A drill press and machining vise helps but you can do it without these items.
Next drill 4 holes through the rubber blocks spaced equally apart . The first, using a 5/32" drill bit, should be drilled through the solid material and will be used to attach the block to the fin. The other three holes are drilled with a 9/64" drill bit and are used for attaching the spring to the blocks. By drilling three you will have some ability to adjust them in case you switch from wetsuit to dry suit.
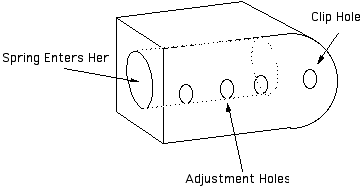
Now let's attach the springs to the blocks. Make sure you have already put the vinyl tubing over the spring or you might have a problem getting it on afterwards. You will need to bend about two loops of the spring into a "crossover double loop" so you can attach the spring to the blocks. If you have a company that does spring work they might do this for you for a couple of bucks. I did it myself with a couple of needle nose pliers which works OK after some "cussing and discussing, but "Ya gotta hold yer mouth juuuuuust right. Know what I mean Vern?"
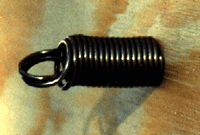
To attach the spring to the blocks you will use SS bolts, SS washers and SS nuts with nylon inserts. Insert the spring into the " hole in the rubber blocks and put the bolt through a hole to engage the loop. A SS washer should be used on each side of the rubber block. The SS nut with nylon insert will secure things and insure that they don't come apart at an inopportune moment (like 18 grand into Wakulla or in a stateroom of the Doria). Bolt size is 8-32 X 1 &1/4". I could only find 1 & 1/2 " length bolts in SS at Lowe's so the ends on mine protrude which could cause snagging. They can be dressed down with a grinding wheel, file or stone, or just find some the right length. McMaster-Carr has both the bolts and the washers but you need to buy a box of 100 of each. (18-8 SS machine screws, #8-32 X 1 & 1/4 ", part # 91810A201, $6.97 per 100, page 2565) (18-8 SS, Nylon Insert Locknuts, #8-32, part # 91831A009, $5.16 per 100, page 2628).
You may notice that it is rather ugly and looks like you made these at home out of a hockey puck (well what did you expect!). To make it look like something your dive buddies will envy and the girls will swoon over requires some "styling". Take the hardware off the block and get out your belt sander (100 grit belts work fine). Secure your belt sander upside down or on it's side so that you can press the rubber block against it to shape to a more "pleasing" design . If you don't have a belt sander you could do this with a drill and a sanding disk.
Reassemble the hardware to the "styled" attachment blocks and you are ready to attach them to the fins. On my fins (Swimmaster Mark X) the fin strap buckle was one piece of wire bent in the shape of a square "C" with open ends biting into the fin. I cut off the cross bar straitened half of it out to form sort of an "L" and slid it onto the block. Then bend it back to its original shape and crimp it onto the fin. If you are using IDI's version of the Jet Fin you may need to make something from scratch because that hardware is not very conducive to disassembly and re-assembly. I am using some 3/16" brass rod from Lowe's and bent it into the same shape. I understand that SS welding rods could also be used.
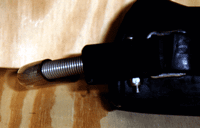
Once they are attached, try them on. Unless you have REALLY big feet you will probably find that they are too large. Simply remove one of the blocks, cut a bit of the spring off, make a new loop and re-assemble it and try it on for size. I would suggest that you size the springs so that they fit you when attached to the holes giving the tightest fit when you are wearing wetsuit boots. That way when switch from wet to dry and need a little extra room you can simply adjust them to a looser fit.
Now stand back, admire your work and listen for the swooning...
On second thought let's go diving!